Saturday, December 12, 2009

A Tip from the Dietitian....


HOLIDAY EATING

This is the time of year when most people are busy with all the things that make the holidays special. It’s also the time of year when, for many of us, our goals to eat healthy seem all but forgotten until the New Year comes around. You are likely to be familiar with the standard healthy holiday eating tips. Perhaps these additional tips can also help this holiday season.
1.    Review your past holidays and identify behavior with your food and beverages you’d most like to improve on. Think through a new way to deal with these “problem”  areas.
2.    Eat regular meals, even on those special days… when you arrive at a meal hungry you are much more likely to eat too much.
3.    Focus on the things you can do rather than what you “shouldn’t do”…work to find ways to include plenty of healthy fruits and especially nutrient- rich vegetable servings each day.  
4.    Drink plenty of water to help stay hydrated and eliminate the possibility of “confusing” thirst with hunger.
5.    Work to include daily exercise even if all you can work in is a brief 10-15 minutes. You will feel better, and have an opportunity to re-focus on your nutrition goals for the day.
Happy Holidays!!

Tuesday, December 8, 2009

Recipe: Golden Raisin, Apple and Cinnamon Granola


Granola is a cereal-like combination of dried fruits, grains and nuts. Though it's a good source of protein and fiber, granola can also be high in fat and calories, especially the store-bought varieties. Watch your portion sizes or create your own granola to limit the amount of fat, calories and sugar in each serving.

Ingredients:
1/4 cup slivered almonds
2 cups dry, old-fashioned oatmeal
2 cups bran flakes
3/4 cup dried apple pieces
1/2 cup golden raisins
1 tablespoon ground cinnamon
1/4 cup honey or Agave Nectar
1/4 cup unsweetened applesauce
1 tablespoon vanilla extract

Directions:
1. Preheat oven to 325 F. Lightly coat a baking sheet with cooking spray.
2. Spread the almonds on the baking sheet and bake, stirring occasionally, until golden and fragrant, about 10 minutes.
3. In a small bowl, whisk together the honey, applesauce, vanilla, and cinnamon. Set aside.
4. In a large bowl, add the oatmeal and bran flakes. Stir to mix well. Add the honey mixture and toss with your hands. Don't break the clumps apart.
5. Spread the cereal mixture evenly onto a baking sheet. Place in the oven and stirring occasionally, bake until golden brown, about 30 minutes. Remove from the oven and cool slightly.
6. In a large bowl, combine the cereal mixture, toasted almonds, apple pieces and raisins. Cool completely. Store in an airtight container.

Nutritional Analysis: Per 1/2 cup serving
Kcal: 163
Carbs: 33g
Total Fat: 2g
Saturated Fat: 0
Monounsaturated Fat: 2g
Cholesterol: 0
Fiber: 4g
Calcium: 27mg
Sodium: 115mg
Potassium: 216mg

Monday, December 7, 2009

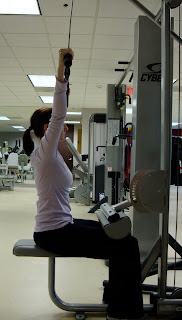
Exercise of the Week - Lat Pulldown

The Lat Pulldown is a great exercise and strength training move for the upper back and biceps.  Although the biceps are secondary, they are still involved because any time you FLEX the elbow, the biceps contract.  So, the muscles involved in Lat Pulldown are the Latissimus Dorsi (imagine that??), Rhomboids, Posterior (Rear) Deltoids, and Biceps.
There have been several questions raised as to where you should "pulldown."  Behind the head or not?  I will tell you there is a greater risk of injury involved in a behind the neck Lat Pulldown.  Why is this?  Well, here my little biomechanical  rant...

The NECK is excessively flexed which places great stress on the cervical spine and disks.  The shoulders are stressed because they are placed in an extreme external rotation and a hyper-extended position (i.e. the shoulder-elbow alignment is behind the mid-line of the body).  This stress could contribute to injuries such as shoulder impingement, rotator cuff problems, and anterior shoulder instability.  The Lat is also NOT optimally challenged because the line of pull does not adequately oppose the muscle fibers of the Lats.

Okay, that said, here is the correct approach to a Lat Pulldown:

1.  Place the feet firmly on the floor and hands on the bar, a little wider than the elbows, in an overhang grip.


2.  Pull the bar downward slightly, maintaining neutral posture and leaning back at the hips about 20 to 30 degrees (without rounding the back).


3.  Retract and depress the scapula (shoulder blades) and hold throughout the exercise.


4.  Contract the abs and begin movement by contracting the Lats, driving the elbows down toward the floor and back slightly.

5.  Pull the bar toward the upper chest while keeping the trunk from moving back and forth.

6.  Return to the starting position.

And as always....DON'T forget to breathe!!

Till next time....Christie


Saturday, December 5, 2009

Yoga Pose....Downward Facing Dog

Adho Mukha Svanasana
(AH-doh MOO-kah shvah-NAHS-anna)
adho = downward
mukha = face
svana = dog


1.  Come onto the floor on your hands and knees.  Set your knees directly below your hips and your hands slightly forward of your shoulders.  Spread your palms, index fingers parallel or slightly turned out, and turn your toes under.

2.  Exhale and lift your knees away from the floor.  At first keep the knees slightly bent and the heels lifted away from the floor.  Lengthen your tailbone away from the back of your pelvis and press it lightly toward the pubis.  Against this resistance, lift the sitting bones toward the ceiling, and from your inner ankles draw the inner legs up into the groins.

3.  Then with an exhalation, push your top thighs back and stretch your heels onto or down toward the floor.  Straighten your knees but be sure not to lock them.  Firm the outer thighs and roll the upper thighs inward slightly.  Narrow the front of the pelvis.

4.  Firm the outer arms and press the bases of the index fingers actively into the floor.  From these two points lift along your inner arms from the wrists to the tops of the shoulders.  Firm your shoulder blades against your back, then widen them and draw them toward the tailbone.  Keep the head between the upper arms; don't let it hang.

5.  Adho Mukha Svanasana ison of the poses in the traditional Sun Salutation sequence.  It's also an excellent yoga asana all on its own.  Stay in this pose anywhere from 1 to 3 minutes.  Then bend your knees to the floor with an exhilation and rest in Child's Pose.


Tuesday, November 17, 2009

A Tip from the Dietitian....


Calcium is essential to the development and maintenance of healthy bones.  Many people, especially women and teenagers are not meeting their daily need for calcium.  Take steps now to prevent Osteoporosis.  Use these tips to make sure you get enough calcium.

*  Know how much you need:

Teenagers: 1,300 mg/day

Adults (age 19-50): 1,000 mg/day

Adults (age 50+): 1,200 mg/day

*  Become familiar with good calcium sources:


8 oz. milk: ~300 mg

8 oz. yogurt: ~400-450 mg

1 oz. low-fat cheese: ~200 mg

1 cup low-fat cottage cheese: ~155 mg

1 cup spinach or collard greens: ~300-350 mg

3 oz. salmon (bone-in): ~325 mg

1 cup soybeans (edamame): ~260 mg

*  Add milk or yogurt to recipes whenever possible:


Make oatmeal and hot chocolate with milk instead of water

Make fruit smoothies from frozen fruit blended with yogurt and/or milk

*  Look for calcium-fortified orange juice and other foods as well (especially if milk or yogurt are limited in your daily intake)


It takes more than an adequate intake of calcium to build strong bones.  Regular weight-bearing activities are important too.

Christie's "Healthified" Pumpkin Bread


Yield: 2 Loaves (12 Slices Each)


Dry Ingredients:
2 cups unbleached all-purpose flour
1 cup whole wheat flour
1 cup raw organic cane sugar
1/2 cup milled flaxseed
2 tsp baking soda
1 tsp baking powder
1 tsp salt
1 1/2 tsp ground cinnamon
1 tsp ground nutmeg
1 tsp ground all-spice
1/2 tsp ground cloves

Wet Ingredients:
2 cups pureed pumpkin
1 cup fat free milk
4 egg whites
1/4 cup olive oil
1/4 cup molasses

Directions:
1.  Heat oven to 350 F.  Spray bottom of two 9x5-inch loaf pans with cooking spray.  In a large bowl mix the first 11 dry ingredients until well blended.
2.  In medium bowl, mix the 5 wet ingredients until well blended.  Stir wet mix into the dry mix bowl until well blended.  Spoon batter evenly into prepared pans.
3.  Bake about 30 minutes.  Then cover loosely with foil and bake another 30-40 minutes until toothpick inserted in center is clean.  Cool on cooling rack 10 minutes.  Loosen sides of loaves from pan.  Remove from pans onto the cooling rack.  Cool completely, about 1 hour.

Serving Size: 1 slice
Calories: 190
Fiber: 2 grams
Total Fat: 5 grams (0 Saturated Fat)
Total Carbohydrates: 32 grams
Cholesterol: 0 mg
Protein: 3 grams

Wednesday, November 11, 2009

Exercise of the Week - Hip Extension

Okay, the exercise of the week is....Hip Extension!  It is often underrated and left out of many workout programs.  However, it also happens to be one of the most important strengthening exercises out there.  Why?  Because it strengthens the upper back, lower back, glutes (buttocks) and hamstrings - all the muscles that need strength and stability to perform many daily activities (examples: walking and climbing stairs).  This exercise is often executed with improper form and technique, as well as improper range of motion.  It is very important to properly align and position the spine.  Tempo is another area where most of us go wrong.  Slow down!

The pictures below show the beginning stance and the bottom of the movement.  The progression of this exercise is to move to a one-leg hip extension with a single dumbbell in the opposite hand of the stance leg.  The single leg version challenges balance as well as ankle stability.

Let's do this...


Position feet straight ahead and directly under your hips, with a slight bend in the knee.  Begin from the stance position with the shoulders back and the spine and head in good posture.  Keep that core tight!


Begin to inhale as you move at the hip joint (not the low back).  Push the hips back and lower the trunk as low as the hamstrings will allow while keeping the dumbbells close to the body and maintaining good posture.  Pause at the bottom position, then begin to exhale as you push those heels into the ground while giving the glutes a good squeeze.

** If you begin to feel as though you are straining your low back, make sure you are not over-arching your low back.  Also, be aware that the movement comes from the hips, not the low back.


When you have mastered this movement, you can then progress to single-leg hip extension.  The lowering movement is the same as before.

Happy exercising!  Until next week......Christie

Wednesday, November 4, 2009

A Tip from the Dietitian....


Eating adequate fruits and vegetables each day is easy!  Yet for many people it feels like a daunting task.  Fruits and vegetables, especially the naturally deep colored vegetables, are a rich source of the many nutrients needed for a healthy diet.  They also offer a good and natural source of fiber.  Use these tips to help make sure you meet your daily needs.

* Know how much you need: aim for at least 5-9 servings per day total

* Become familiar with serving sizes: usually 1/2 cup equals a serving size

* Grab the quick and easy: ready to eat raw fruits & vegetables;  frozen vegetables in ready to steam bags

* Add vegetables where possible: Frozen spinach can boost the nutrient value of spaghetti sauce and lentil soup.

* When eating out request fresh fruit for dessert and steamed vegetables along with your entree even if not on the menu.  Most restaurants are happy to help.

* Frozen, unsweetened fruit make a great smoothie; just add yogurt and blend.

* Whole fruit and vegetables are usually best over their juices.  They provide more fiber and make it easier not overdo.  If consuming juice, beware of serving sizes.

* Fresh fruit makes an easy and portable between meal snack.


A Registered Dietitian can help you add more fruits and vegetables into your eating plan.

Sunday, November 1, 2009

Exercise of the Week - Side Plank

Although this may look like something you may see in Lisa's awesome Yoga class, it is also an isometric strength and stability exercise I use often with my clients.  And, oh, do they love it!!!  The goal of the side plank is to develop core stability and strength.  Well great, but why is that important?  Our body's "core", like the true definition of the word, is the innermost part of our musculature.  It consists of the muscles that are deep to the outer trunk muscles.  These innermost muscles of the abdominal, pelvis and back play a dual role.  They are responsible for both respiration AND stabilization of the spine.  They are unique in that they operate under separate neurological control and can function independently from the outer or larger trunk muscles.  It is super important to learn how to "activate" these muscles in order to have a solid foundation upon which to build your strength training routines.  Developing and maintaining a strong "core" is essential in injury prevention  during any exercise program.  And hey, you could get a great looking stomach in the process!  Okay, as you know, I could go on and on about exercise physiology and break this stuff down until your are totally bored and confused.  BUT, I will spare you and move on to the exercise itself!

I have broken it down to a beginning level, medium level, and most challenging level; so progress accordingly, and ONLY WHEN you have mastered good control of the previous level.


Begin on your side with your elbow underneath your shoulder.  The inside leg is bent and the outer leg is straight out.  Using your hip, and not your shoulder, push yourself up until your body is in a straight line.  When you are stable, raise the top leg without losing control of your bottom hip or proper spinal alignment.  Hold for 15-30 seconds.  Switch sides and repeat.  Try 2-3 sets.


To progress, you may lift and lower the top leg in a slow, controlled motion.  Again being mindful of good spinal alignment.  Try for 8-10 reps, 2-3 sets on each side.


And finally, after you have successfully mastered the first 2 levels, you may progress to a straight, stabilizing arm/shoulder.  Again, the hand should be directly under the shoulder as not to elevate the shoulder.  Try holding for 15-30 seconds and progress to a raised outer leg.  Try for 2-3 sets on each side.


Always keep good posture in mind, keep the inner abdominals contracted and DON'T FORGET to BREATHE!
If at any time you feel pain (not the whimping out kind) or discomfort, stop and modify your position.  It is always okay to rest and regroup.

Have fun!  See you next week....Christie

Monday, October 26, 2009

Yoga Pose of the Week - Triangle Pose (Trikonasana)


From Mountain Pose or a standing postion, on an exhalation, step your feet 3 1/2 - 4 feet apart.  Raise your arms parallel to the floor and reach them actively out to the sides, shoulder blades wide, palms down.

Turn your left foot in slightly to the right and your right foot out to the right 90 degrees.  Align the right heel with the left heel.  Firm your thighs and turn your right thigh outward, so that the center of the right knee cap is in line with the center of the right ankle.

Exhale and extend your torso to the right directly over the plane of the right leg, bending from the hip joint, not the waist.  Anchor this movement by strengthening the left leg and pressing the outer heel firmly to the floor.  Rotate the torso to the left, keeping the two sides equally long.  Let the left hip come slightly forward and lengthen the tailbone toward the back heel.

Rest your right hand on your shin, ankle, or the floor outside your right foot, whatever is possible without distrorting the sides of the torso.  Stretch your left arm toward the ceiling, in line with the tops of your shoulders.  Keep your head in a neutral postion or turn it to the left, eyes gazing softly at the left thumb.

Stay in this pose for 30 seconds to 1 minute.  Inhale to come up, strongly pressing the back heel into the floor and reaching the top arm toward the ceiling.  Reverse the feet and repeat for the same length of time to the left.